Tutorial: Physics in a 2D platformer game
The bounding box
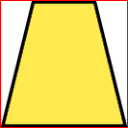
The first thing we need to do is write some code that will help us with defining the player character's bounding box. The bounding box is what defines the physical edges of our player character. To keep things simple for our physics system, we ignore the trapezoid shape of the player and use only its bounding box to check for collisions instead. The picture below shows an enlarged version of the player character we'll add to our game. It looks simple, sure, but at this point we don't care about fancy graphics yet. This yellow trapezoid will be our player character and the red square indicates the size of its bounding box. In the game itself, the player character will be a 32x32 pixels image and have a 32x32 bounding box.
To allow us to deal with the bounding box, first we start with creating a BBox class (short for Bounding Box). The basis of this class looks like this:
  abstract class BBox
  {
    protected Vector2 position;
    private int width;
    private int height;

    public BBox(Vector2 position, int width, int height)
    {
      this.position = position;
      this.width = width;
      this.height = height;
    }

    private Vector2 getCenter()
    {
      return new Vector2(position.X + (width / 2), position.Y + (height / 2));
    }
  }
A BBox instance has a position (a Vector2 object, which is MonoGame's version of a 2D vector with an X and a Y component), a width and a height and it can automatically calculate the center point of the bounding box, which we'll need later on. A good start, but we will also need methods to get the X or Y axis positions of the top, bottom, left and right edges of our bounding box
  public float getTop()
  {
    return position.Y;
  }

  public float getBottom()
  {
    return position.Y + (height - 1);
  }

  public float getLeft()
  {
    return position.X;
  }

  public float getRight()
  {
    return position.X + (width - 1);
  }
One thing that's easy to overlook is that to get the bottom and right positions of our bounding box, we aren't just adding height or width to our top and left values respectively. We add height - 1 and width - 1. The reason for this is quite simple but a bit counter-intuitive at first. If our left edge is located at position 0 of the X axis and we move width pixels to the right (in this case 32 pixels) then we end up on pixel number 32, while our right edge is actually at pixel 31. Pixel 32 is the first pixel next to our character. It's a small detail, but something to keep in mind, otherwise you'll end up running into problems when trying to navigate corridors that are exactly as wide or high as your player character.
Now that we can retrieve the world coordinates of each edge based on our position, we can also derive in what row or column of level tiles that edge is present. We add a few more methods for this.
  public int getTileCenterX()
  {
    return coordinateToTile(getCenter().X);
  }

  public int getTileCenterY()
  {
    return coordinateToTile(getCenter().Y);
  }

  public int getTileTop()
  {
    return coordinateToTile(getTop());
  }

  public int getTileBottom()
  {
    return coordinateToTile(getBottom());
  }

  public int getTileLeft()
  {
    return coordinateToTile(getLeft());
  }

  public int getTileRight()
  {
    return coordinateToTile(getRight());
  }

  private int coordinateToTile(float coordinateValue)
  {
    return (int)Math.Floor(coordinateValue / Level.TILE_SIZE);
  }
This offers us a way to easily keep track of all the edge positions and related tiles. We will make extensive use of this later on.